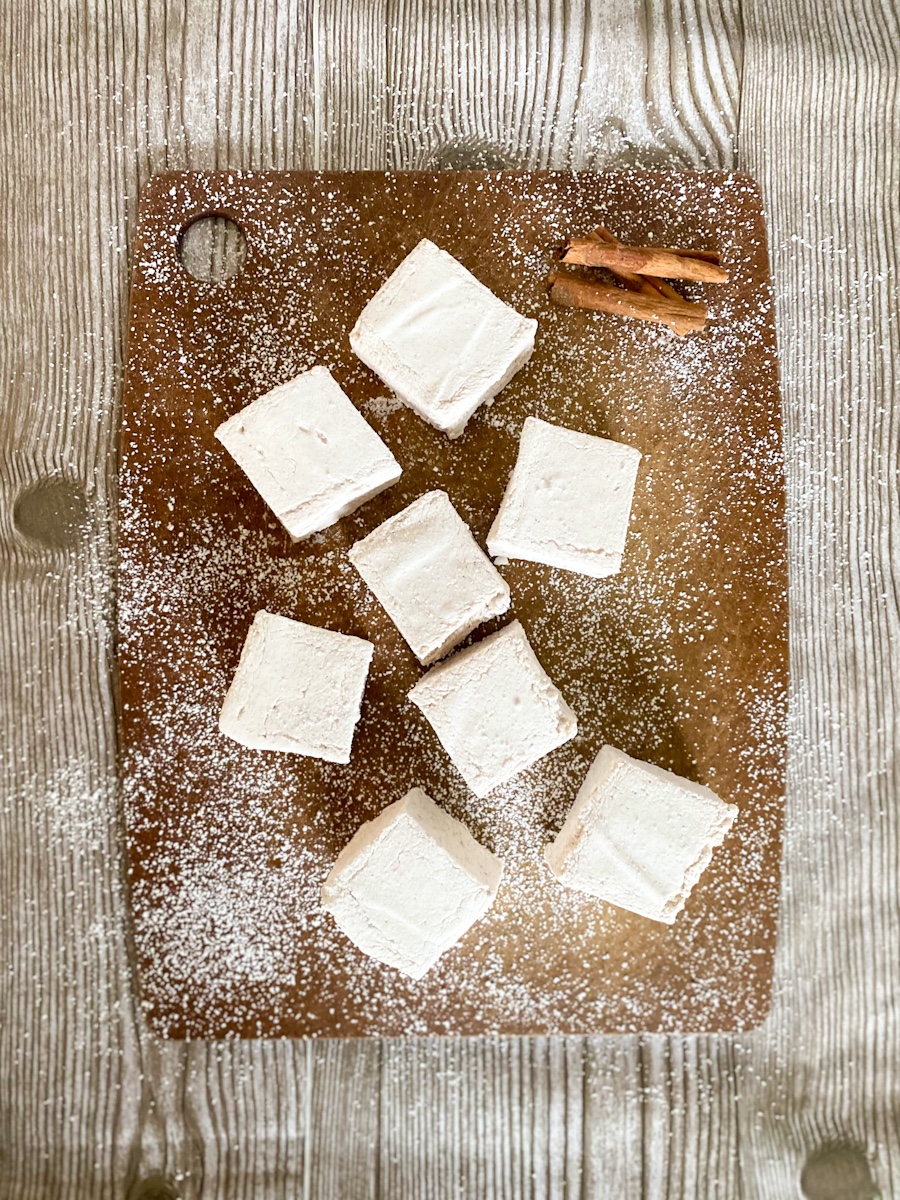
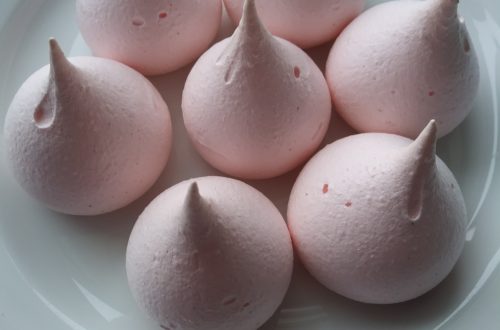
Homemade Cinnamon Marshmallows
It’s spooky season, my friends. Halloween is just days away, which means costumes, trick-or-treating, and, most importantly, CANDY. I have so many memories from childhood running through the streets of my hometown with my friends, gathering treats from the neighbors like an adorable little bandit (back then we trick-or-treated without adults…in the dark…gotta love the ’80s!).
But since I’m now too old to go door-to-door collecting peanut butter cups and kit kats (who makes these rules anyway?), these days I make my own candy. (Yes, I know I can just go to the store and buy myself all the kit kats I can eat, but this is more fun.) This year I made these Homemade Cinnamon Marshmallows, and they’re so good I had to share them.
Homemade Marshmallows > All Other Marshmallows
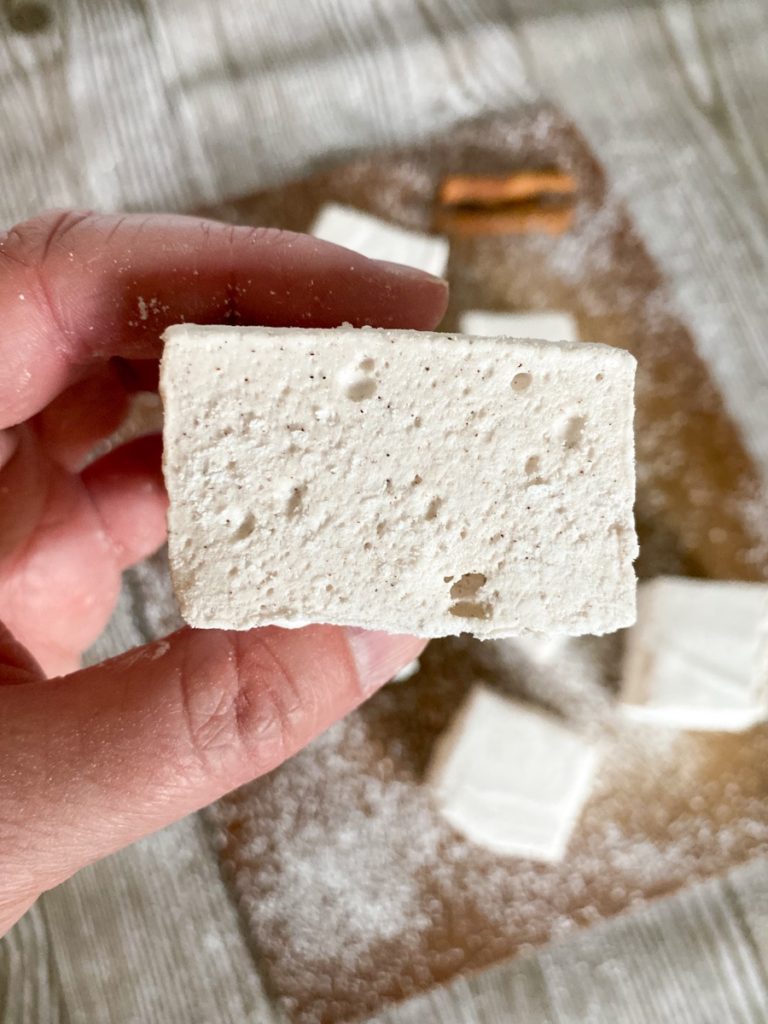
If you’ve never had homemade marshmallows before, I’ve gotta tell you you’re missing out. They’re soft and squishy, like sugary little pillows, and the flavor is out of this world. They’re so much better than store-bought…it’s like the difference between fresh herbs and dried ones.
I made my first homemade ‘mallows last year — check out my Peppermint Swirl Marshmallows here — and learned that they’re insanely easy to make. Delicious, soft, and easy…why ever buy store-bought again?
This year I decided to go for more of a fallish flavor. I thought about doing chai or gingerbread (which would be SO good! Maybe next year…), but in the end I went simpler, and just added a ton of cinnamon. And I’m so glad I did, because they ended up tasting a lot like cinnamon ice cream…which just happens to be my favorite ice cream flavor of all time.
Tips for Making Your Best Marshmallows
Homemade marshmallows are so much easier to make than they seem — provided you have a stand mixer. They do require a LOT of mixing at high speed, so I don’t think a hand mixer would work in this case. (But feel free to try it out if you want). Here’s the gist:
- First, dust your pan with powdered sugar so you can be ready to pour your marshmallow goop in it right when it’s done.
- Then, you need to bloom the gelatin. “Bloom” basically means to let it sit in water for a bit so it dissolves and starts to thicken.
- Meanwhile, make a sugar syrup with sugar, water, and corn syrup. Yes, corn syrup is necessary for this recipe. It helps keep the syrup from being grainy. Your syrup needs to come up to 240°F, so you’ll need a candy thermometer for this (it doesn’t have to be fancy — a cheap one from the grocery store will do). You’ll also need some patience for this step: it takes a WHILE for it to come up to temp. But it’ll get there, don’t worry.
- Once your syrup is done, pour it slowly into the gelatin-water mixture while beating at low speed.
- Then once all of the syrup is added, increase the speed of the mixer and whip it until it’s thick and fluffy.
- When it’s nice and thick, add the vanilla and cinnamon and mix it until it’s well combined.
- Then pour your marshmallow goodness into the prepared pan, dust it with more powdered sugar, and let it sit for 8 hours or overnight, uncovered. This allows it to set and dry out a bit.
- Then dump them out of the pan, cut them up, and enjoy! (They might stick to the pan a bit. If they do, just gently pry them out with your hands.)
And voilà! Homemade Cinnamon Marshmallows.
I have a feeling that once you make your own marshmallows, you’ll be hooked.
Want to try making more candy? Try your hand at these Irish Coffee Truffles or some meringues!

Stay Up-to-Date With the Latest Northern Ginger Recipes
Join my email list to get notified about new blog posts and receive occasional newsletters (if I ever get around to writing them:)).
Homemade Cinnamon Marshmallows
Equipment
- Candy Thermometer or other high-temperature thermometer (needs to go up to 240°F)
- Stand Mixer with Whisk Attachment
Ingredients
- 3 packets unflavored gelatin
- 1/2 c cold water
- 1 1/2 c granulated sugar
- 1 c light corn syrup
- 1/4 tsp kosher salt
- 1/2 c water
- 2 tsp vanilla bean paste or vanilla extract
- 2 tsp ground cinnamon
- powdered sugar, for dusting
Instructions
- Use a sifter or sieve to generously dust an 8×8 or 9×9* non-metal baking dish with powdered sugar. Set aside.
- In the bowl of a stand mixer fitted with a whisk attachment, combine the gelatin with the 1/2 c cold water. Let it rest while you make a sugar syrup.
- In a small saucepan (1 1/2-2 qt), combine the granulated sugar, corn syrup, salt, and 1/2 c water. Cook over medium heat, stirring until the sugar dissolves.
- Then turn the heat to medium-high or high and cook (not stirring) until the syrup reaches 240°F on a candy thermometer. (Note: if it looks like it might boil over, reduce the heat a bit)Remove from heat.
- With the stand mixer beating on low speed, gradually pour the hot sugar syrup into the gelatin mixture. Once all of the sugar syrup is added, raise the speed to high and beat until the mixture is thick and fluffy. (This took me a little less than 10 minutes, but it could take up to 15).
- Add the vanilla bean paste or extract and the cinnamon, and continue beating until thoroughly combined.
- Pour into the prepared pan and use the spatula to smooth the top, making sure the mixture fills into the corners. Use the sifter/sieve to dust the top of the marshmallows with a good layer of powdered sugar.
- Let stand overnight at room temperature, uncovered, to allow the marshmallows to cool and dry out a bit.
- The next morning, turn the marshmallows out of the pan onto a cutting board. If the edges of your pan are rounded, and you want straight sides on your marshmallows, cut the edges off of the marshmallow slab first (a snack for the chef!).Then cut into 16 marshmallows (or more if you want smaller 'mallows). Tip: dust the knife with powdered sugar in between cuts to keep it from sticking too much.
- Store marshmallows in an airtight container at room temperature, preferably covered in powdered sugar (to keep them from getting too dry). Stored like this, marshmallows can last for 2-3 weeks.
Notes


4 Comments
Pingback:
Pingback:
Julia Tauscher
What would happen if you used a rimmed baking sheet (metal)? Also, how does the powdered sugar stay on the sides of the dish when dusting? Do you use a non-stick spray first? I’m going to make these tomorrow.
Jamie
Great questions! I think a metal baking sheet would actually work fine – I just prefer ceramic or glass because they’re naturally a bit more nonstick. Just make sure the sides are tall enough (in a 8×8 or 9×9 pan the marshmallows will be an inch and a half thick or so…if you use a 9×13 they’ll be thinner).
The powdered sugar doesn’t stick to the sides of the pan very well, to be honest, but I haven’t had an issue with sticking. For a metal pan I’d spray it lightly with nonstick spray first, then dust with the sugar.
Hope that helps!